Sunday 13 July 2014

Espro Press Medium is here!

Well, it's actually here been close to one month - 3 weeks.  Let's start with some unboxing first :)


So how does it brew? Well, in short, it does brew a cup of fantastic press coffee with minimal sludge!

The goodies:
- Excellent cleaner press-style coffee
- Minimal sludge at bottom
- A nice piece of shiny eye-candy
- Insulate the coffee well so you can sip for an hour with coffee still warm
- Cleans easier than the small-sized Espro Press

The not so nice:
- Still retains plenty of coffee
- Pricey, very pricey
- Concern of mesh screen durability

I loved Espro Press for its ability to deliver a cleaner (less gritty) cup of press pot coffee, without much effort. If you're using a cheapo french press, the grittiness in cup will be very noticable and it's a huge jump to Espro Press. But if you're coming from one of the better made French Press with fine mesh screen, the difference is there but not extremely apart. Coupled that with the shiny beautiful stainless steel, it's a fun and stylish coffee press to use.

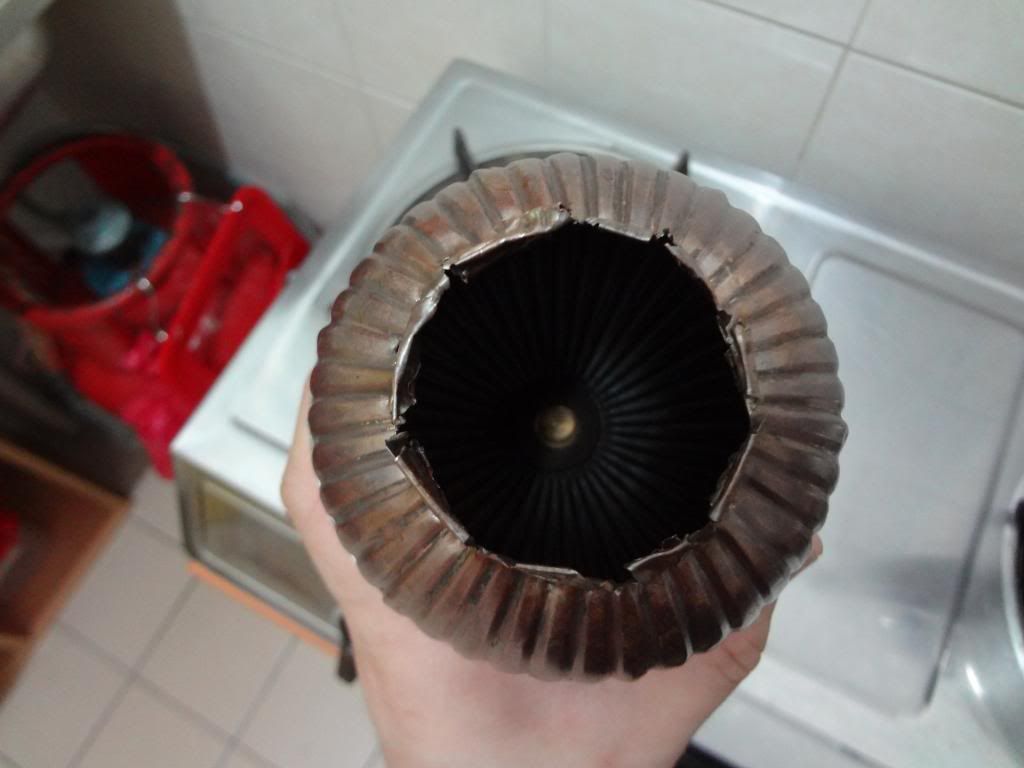
Compared to small Espro Press (10oz) I have used previously, the only difference I noted was the ease of cleaning. The bore of the medium Espro Press is larger that you can fit your hand for scrubing the internal. Whereas with the small Espro Press, you need a brush or sort to clean the inside of the vessels. Basically, that's the only difference I could notice for now.

Coffee retention. Yes. It's still here and you will still find a pool of coffee liquid beneath the filter when you're cleaning. Espro claims coffee retention was reduced, maybe it did. But there's still about 40-100ml of coffee left behind if you just use the Espro Pot as is. This does remind me of why I sold the smaller Espro Press in the first place. Nonetheless, if the coffee retention does bother you, like it does for me, you can do the pumping maneuver to get most of the coffee out.
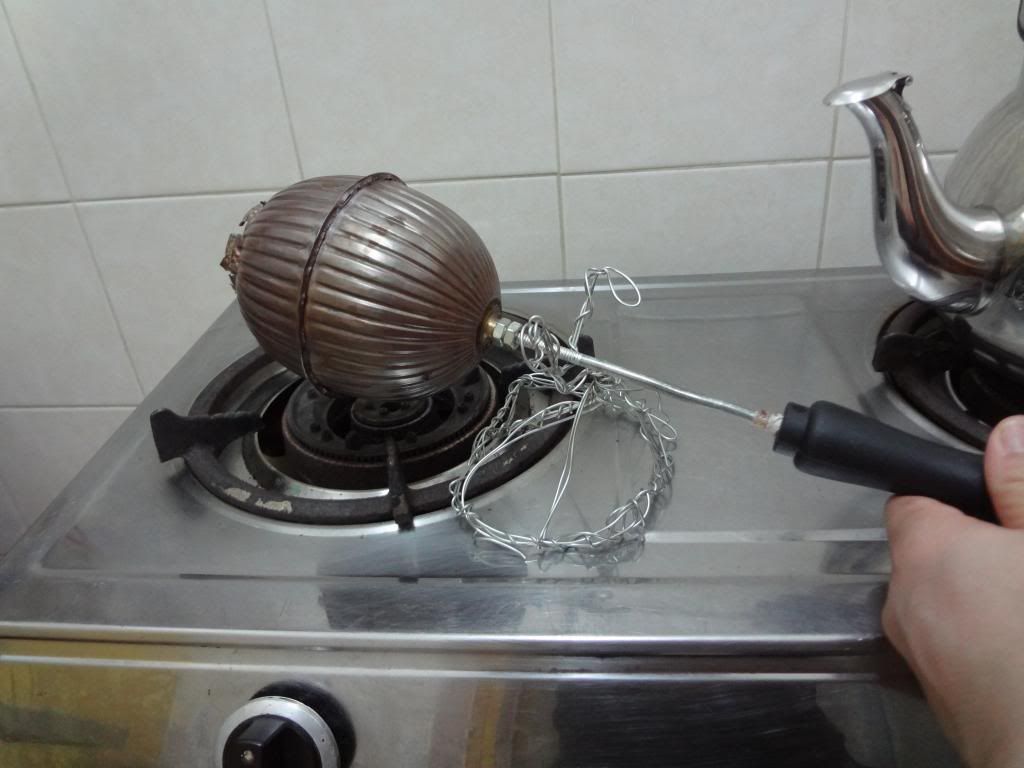
Espro Pull
Somebody shared a video over coffeegeek forum about a Espro Pull method. Basically, it's similar to the concept used on French Press to obtain a cleaner cup. Instead of pressing, you push the filter down, before adding hot water and coffee. After you add coffee and water, the filter screen is lifted up (Pull) to remove the ground coffee. I tried this using the Espro Press, and wow. It yielded a superly clean cup of coffee. Very much like pour over coffee. Too clean in fact for my liking. What comes as a surprise is when brewed this way, the coffee retention on the Espro Press is ZERO. Tarak! I liked this method for the zero retention but didn't like the too-clean coffee.

Conclusion
So the Espro Press is still not a perfect French Press for me. But since bill's been paid, and quite expensive at that, I may choose to keep it to brew a clean cup of Press Pot coffee whenever I feel too lazy to break out my Portaspresso.

Tuesday 10 June 2014

Coffee Brewing

95% of the time, espresso is my go-to drink. It's very simple - espresso is fun to make, the thick espresso flow just excites me for no reason, the taste is strong and yet subtle at the same time, I can drink more shots of espresso and only 1-2 cup max of brewed coffee.

That 5% of other time, I am always pondering between pour over, aeropress, french press, and moka pot. Though I find that I go back to French Press more often than not. It's very fool proof for someone that only brews once a blue moon. Coarse grind + hot water + Freshly ground roasted coffee and you're good to go. No dillema involved swirling clockwise or coutnerclockwise (pour over), inverted or non inverted (aeropress), paper or metal filter, dialing in, etc etc. =P

So what's not to like about the French Press? Most that are used to pour over coffee (It's officially the trend now in Malaysia) will say its the grittiness of the drink or sludge at the bottom of the cup


.........which brings to the whole point of this post... =P there's one Espro Press (18oz medium sized) coming to my way!! ETA next week and I am getting all excited!

If you have not heard about Espro Press, they're a double walled stainless steel French Press manufactured by Espro in Canada. The same company that designed the Espro Click Tamper & Espro Toroid Pitcher. What differentiates the Espro Press is the double microfilter that filters the coffee twice at 10-12 times more effectively. Leaving very little sludge & grittiness in the cup, yet a very robust cup. Sounds like a winner huh?


There is one big 'but' though. I have owned previously and later sold their smaller 8 oz Espro Press. The reason is they retain almost 2oz(60ml) of coffee when used normally, and 2 oz out of 8oz is a lot. I just can't bear to see those good coffee wasted like that.

Good thing is they claimed that the coffee retention is reduced with the new filter design. Let's wait and see. =D

New(left) vs Old(right) Filter Design


p/s: And one more thing I thought I should mention...they're not cheap!!

Sunday 1 June 2014

Water Effect on Espresso/Coffee Brewing

In brewing the finest cup of coffee, we always talk about the latest grinder for ultra uniform grind size, the most sophisticated brewers out there,the best coffee origin(no doubt important). However, we often take one very important thing in coffee for granted - the water quality.

Why water is important?
Water is the most important and abundant ingredient, in making up to 99% of a cup of coffee. So if the water used is off-flavor, it will be carried into the cup. So it's always recommended to used clean filtered water for your all coffee brewing, you don't want the muddy taste or extra particulate in your morning joe.

Solvent and solute characteristic
There is another important role of water which is as an acting solvent. In the coffee brewing process, it's all about how the water molecules extract the desirable aromatic compounds into the final solution (not the most scientifically precise description but that's the gist). This is why the composition of water (trace elements like mineral etc) is so important. If the water is too pure (distilled water for example), its affinity for pulling the solute will be very high, including those undesired ones. On the other hand, if there're way too much mineral or impurities, the water molecules will be too occupied to dissolve the desired coffee solutes. So the end result would be subpar too.

pH
The pH of the water will also skew the extraction preferential of the water, just like how pH affects a chemical reaction in a chemistry lab. You can imagine it to be more H+ in acidic water and more OH- in alkaline water. H+ and OH- each will attract different characteristic of molecules, which affects the final result.

Scale formation
Last but not least, for espresso machines maintenance, we will always hear about limescale built-up, or descaling. This is yet another role played by water. Water with a lot of minerals (Calcium and Magnesium) are called hard water. When hard water are boiled or heated, the excess calcium/magnesium will precipitate, forming insoluble white solids - AKA limescale. If this happens in an espresso machine, it will clog up the machine and lead to potentially costly repair. To prevent this, descaling (using acids) is done intervally, or the water is softened before going into the machine. Fortunately for us in Malaysia, the water here are soft water and scaling doesn't happen unless you use mineral water from the store.

My experience
Even though our water is soft water, is it suitable for coffee? In my experience, I don't think entirely so. It is safe for the machine because the water doesn't form scale. And for most of the time, the water is clear looking and free from mud particle. However, when brewing espresso with the water at my house, I can always sense that the espresso has an odd aftertaste. It's very subtle but is noticable to me. I suspect this may be the chlorine or some other ingredient used in the water treatment process. My house water is filtered with active carbon filter (Panasonic) and the filter cartridge is changed according to schedule. I tried searching high and low, on the internet, but couldn't find anyone else that has same experience as mine.

I have tried the RO water in my office too. It filters the water alright, but it has an alkaline cartridge that adds salt(not table salt) into the water. So the espresso brewed using that is very thick-bodied, but the aftertaste is extremely short. Too short for my liking.

So, the solution I've come to, is to use store bought bottled water. It seems to improve my espresso quality and no longer gives the odd aftertaste. The aftertaste is long and decent.

But this solution may not be suitable for everyone. And I suspect this is probably not a problem for most to begin with.

But the point is, if you're planning to use bottled water in your machine, beware of mineral water with high calsium/magnesium content. I find that most mineral water will form scale. If you're using mineral water for long term, scale-formation is certain and you need to descale every few months. If not, your best bet is to used filtered tap water because that is the safest water for the machine. Just a bit of compromise in the taste, but it's probably not very noticable to most...

Friday 17 January 2014

Roasting - Bean Defects

Did you know that, coffee beans are actually not beans? I certainly did not, until I dig deeper into coffee recently! Coffee 'beans' are the seeds from coffee cherries, that are harvested and processed into green coffee seed, that eventually roasted into what we see.

Here's a little diagram I made using some pictures from Google search into an easy-to-understand diagram.


At the same time also, I got into coffee roasting at home. I learnt that any part of the process above, either from planting the coffee bushes, until final step where the roasted beans got into our hand, will have an impact on the final cup quality. For example, if the green coffee beans are not stored at proper temperature, or if the roasting proccess got screwed up, or if the beans are not harvested selectively, either way, we will end up with an inferior coffee. So that's a very thin line we're walkingthere. And even we did perfectly until the roasting step, with the wrong parameter in brewing, we will STILL ruin the coffee. So you get the idea- every step has to be perfect (or at least as close as humanly possible).

Next are some pictures I took from a Ethiopia Yirgacheff I roasted recently. These are bean defects and I will try to link to the possible cause.


Figure Above: Irregular beans - probably due to harvesting process

Figure Above : Empty Shells - Most likely due to sorting process

 Figure Above : Small/Mini Beans (Normal beans on left) - May be the plant is not fertilized enough, or just variation of the coffee plants

 Figure Above : Coffee Shards/Pieces - Could be due to transport or harvesting. Sometimes due to rough handling of roasted coffee

 Figure Above : Cut Beans (Normal beans on left) - May be cut by harvesting machines

Figure Above : Bug bites (Normal beans on left)- A good sign that they're not abusing pesticide? Haha

Figure Above : Unsure(Bug or cut?)

Figure Above : Quakers (Normal beans on Left)- these are beans that appear yellowish even after being roasted. May be due to immature beans harvested

Figure Above : After picking out all the beans defects


The next time before you grind your beans, just have a closer look at the beans. Are they regularly shaped? Any defects you could detect? If they look healthy, be grateful (I do!) that the person prior to you has taken their best effort to ensure beans arrived in your hand perfectly, it's not easy feat. Cheers!


Wednesday 4 December 2013

Bringing your espresso anywhere - not your average espresso

If you have followed my previous blog entry, you will know that I have an orange color lever vintage machine. But as perfectionist coffee lovers, we are always constantly looking for something better, trendier and newer. ;P So this portable espresso maker has caught my attention ever since it came out last year.


It's called Rossa PG and in a sense, it's conceptually similar to Mypressi Twist that is more popular, which is another portable espresso maker that is known to make decent quality coffee. The downside of Mypressi Twist is that you have to buy the disposable cartridges which can quickly adds up the cost, not environmental friendly too! And the barista has to pay attention to the brew temperature due to heat loss. Both of which issues are solved in Rossa PG and additionally, it has the brew pressure gauge and pressure regulator for pressure profiling!

So now I will guide you through what you will need to make an excellent espresso portable:


In short, you will needs:
i) Rossa PG
ii) Portable grinder - I am using Rosco Mini.
iii) Fresh Roasted Beans
iv) Immersion Heater or Kettle

Optional - to make your espresso more consistent:
i) Weighing scale
ii) Thermometer


Steps:
You need to precharge the Air Cylinder. The air cylinder is like your battery, it keeps the 'energy'/ pressure you need to make espresso.


You can either choose a big floor bicycle pump, electric pump, or hand shock pump (the one I have). I chose a hand shock pump for portability and it can get up to 20 bar reasonably. 19 bar of pressure will allow you to make 3-4 shots.


Weigh your beans. 16-18g fits nicely.


Tamp it as you would on a normal espresso machine


Connect/screw the air cylinder to the Rossa PG chamber.


Invert the Rossa PG and preheat it. For preheating, the procedure is 20-5s rule. 20 seconds for first preheat, discard it. 5 seconds for the second preheat, dump it. Third pour of hot water will get you nicely into 93-94 Celcius, and it holds the temperature very steadily there.


Put on your tamped coffee. A fresh roasted coffee will not fall off even if you invert - so don't worry!


Get your shot glass and start pouring. You can choose the pressure you want by varying the valve on the air cylinder (Pressure regulator). You can brew from 0.5 bar preinfusion to 12 bar extraction if desired. Lots of pressure profile possibility here.


For clean up, the puck will come off nicely. Overall, very clean and little to no-mess espresso.

Best of all? Take a immersion heater and make it in your hotel room. : )


This is a video I made last month to show Rossa PG in action.


Sunday 18 August 2013

How I roast my own coffee - Home Roasting DIY

Hi coffee lovers!

Ever thought about how to up your game in your coffee journey further?? Here's how for under Rm100! Don't worry, no string attached! ;P What I am going to show you is how you can roast good coffee at home with minimal investment.

What you need:
i) Copper Ball from Ace Hardware - RM 30
This is the major component you'll need - A copper Ball

I have a confession to make-----actually, this is meant to be a toilet float... But hey, let's make use of it before it really does go into someone's toilet!

ii) Black Plastic Handle, also from Ace Hardware -RM 8
iii) Aluminium Wire 3 Meter, Ace Hardware is your friend again - RM 3
iv) U-shaped hook used normally for ceiling fan, obtained from Home Depot near my house - RM 5
Pic: U-hook. Ignore the metal plate. I took this photo from the internet as I forgot to take photo.

v) A pipe saw - Already have this one, so free!


Pic:Pipe Saw

vi) and some other common tools you will most likely have at home 


Contrusction Proccess:
Once you gathered all the components, it's really easy. Just pop open the copper ball and give it a deep clean inside. Mine is clean but it's never harmful to be on the safe side! You may need a plyer to do open it up. While it's open, let's make a hole at one half of the ball for a hole loading the green beans. Put it back together.

Pic: Hole for loading your beans. You can skip this step if you can magically teleport the beans into the copper ball. *wink*


After that, cut the U-hook into a straight shaft and stick it to the Plastic Handle. Once that's done, screw the handle into the copper ball. Done!


Oh oh, we're actually not quite done yet. The last key you need is a stand for supporting your roaster while roasting on the stove. For this one, it's up to your creativity really. With my lack of design talent, this is what I've came up with. For RM3, I am not going to complain, so long as it works. Haha!


For additional safety step, you may want to do a few sacrificial roasts to coat & clean the inner chamber of the copper ball. Also to get a hang of how the roaster respond to flame changes.


Into Roasting!

Once you're done with the sacrificial roast, remember to keep a roast log and try to take as many notes as possible. Then for your first step, learn to get consistent and then only make changes.

The size of this roaster can roast about 50g-150g no problem. Maximum it could probably go 200g but haven't tried at this point. From my experience, I prefer roasting 100g as that gives me a week of coffee and giving me more learning experience. I will upscale it once I am getting better at roasting.

The best of all is it's very cheap & easy to make. And with a little practice, the result will be just fantastic! No longer you have to
Pic: A full city roast. 


Here's a video to satisfy those who are eager for how it actually works:


If any of you do decide to try it out, let me know how it goes for you and we can share some roasting tips!


P/S: My inspiration actually came from this roaster (FZ-RR-700 -Click the link) from Israel.


Monday 24 June 2013

Rosco Mini from the Portapresso

Hi all,

One of the many things I enjoy in coffee is the hand grinding process. For hand grinder, we are very familiar with Hario Mini and the Hario Skerton, and we also have the Tiamo hand grinder - looks suspiciously similar to Hario design. Then there is plethora of antique hand grinders - the box mills, the brass turkish grinders, etc. In my opinion, one thing that most of these hand grinders lack is the build quality and precision. Very often there is some wobble in the burrs that cause inconsistent grind sizes in the coarse range and the non-sharp ceramic burrs(modern hand grinder) crushes the beans instead of 'cutting' through them. These reasons are exactly what draws me to the Rosco Mini from Portapresso, Australia.

Pic from Portapresso


The Rosco Mini is machine-cut from a piece of brass stock, and the grinder body is cut precisely to ensure (or at least close to) perfect alignment which eventually maximize the performance of the grinder for consistent grind.


Pic: The hero of the day - my Rosco Mini


The first impression I received the Rosco Mini is "damn, this is some serious weight!" With the compact foot print that is close to Hario Mini, it actually packs at least 3 times more dense than the Hario, at 1kg! And you may have already noticed, the Rosco Mini is a very shiny and elegantly made grinder. It's probably the most beautiful coffee thing that I've put my hand on!


Using the grinder

Setting grind size:
This is, in my opinion, the strongest feature on the Rosco Mini, of course next to its beautiful design. With the engraved-marking on the grinder body, it delivers the most precise & REPEATABLE stepless(repeatable yes, stepless yes, but not repeatable stepless) grind setting on all the grinders I have used so far. The grind setting is adjusted by turning the lower grinder body to the desired setting. The distance between each step is measured by the opening of the inner and outer burrs by 0.05mm. This may sound a little technical but once you get your hands on the grinder, it's very intuitive to use, at least to me.

Pic: The grind setting. The top seems like a double shadow but it's actually the reflection.

Bean loading:
It's done by unscrewing the top and invert the grinder to pour the beans in. Very easy especially if you single dose.

Grind effort:
The grind effort is debatable and a very subjective topic. But I find it relatively easy to grind because the diameter just fits into my hand nicely, allowing a firmer grip. Another plus is the Rosco Mini is noticeably quieter when compared to OE Lido, which is already quiet by itself!

Grind retention:
As expected, there is almost no grind retention on the grinder, probably about 0.1g of coffee maximum from the first ever grind. Subsequent grinding will yield much closer to 0.0g retention. No kid! Ocassionally when time are bad where there's lots of static, it will retain about 0.2g at the bottom part. But that's about it.

Pic: The bottom of the grinder


Maintenance:
Given the beautiful appearance of the Rosco Mini, inevitably some level of care needs to be given to keep it in pristine (read: gold shiny) condition. I did not realize the importance of keeping the grinder free from any water drops for the first few days. Thus some dull water spots quickly formed. But luckily, these spots are easily removed by some light-polishing & buffing. Now I am happy to report it's been almost 2 weeks and the Rosco Mini is still a piece shining gold.

Grind time:
At the espresso grind, I found that 10g of beans takes about 70 turns of hand cranking (from start till the handle spins freely). Can be done about 30 seconds, a reasonable speed I would say.


Pic: The Lido is BIG compared to the Rosco Mini, more so than it looks in the picture.

Pic: Credit to Coffeesnob forum for the pic. Just to show where the Rosco Mini stands in term of size.


Conclusion:

The Rosco Mini is a top notch performance and looking really sharp! Repeatable & stepless grind setting, plus the look, is probably what sets it above most other grinders for me. The only downside I could think of is the price, but honestly, this is an almost-perfect grinder in my book. I would definitely buy it again and recommend it to others, if financially allows.